
Starting transplants from seeds in your home is a good way to get a head start on the growing season.
At least four to eight weeks can be cut from the time required between planting and harvesting or of getting effective landscape color by setting vigorous transplants rather than seeds into the garden.
Growing your own plants may be the only way to obtain a new or special variety you want.
Commercial plant growers cannot be expected to grow all of the hundreds of varieties offered by seedhouses, and plant nurseries are often reluctant to offer varieties that have not been given widespread publicity.
Growing Media
Use of a loose, fertile, diseasefree soil mix is a basic key to success.
To prepare a mix of this type combine by volume one part sandy loam with one part sand or vermiculite plus one part Michigan or Canadian sphagnum peat.
Anyone having clay loam should use one part soil to two parts sand or vermiculite and one part peat.
The mix must be pasteurized to kill harmful fungi, bacteria, weed seeds and nematodes that it may contain.
This is easily done by placing the soil mix in a shallow metal pan, covering the pan tightly with aluminum foil and heating the soil to 160° in an oven.
Keep the soil at this temperature for at least one hour or until a potato imbedded in the soil is baked.
After cooling, the soil is ready for planting.
Premixed, soilless material can be bought in nurseries and stores.
Soilless mixes are more expensive than the home mix but can be used right from the bag without pasteurization.
These mixes are economical when used carefully.
The following soilless mix can be prepared at home if the ingredients are available in a local nursery or through a catalog.
•1/2 bushel horticultural perlite, vermiculite, calcined clay or humus
•1/2 bushel coarse sphagnum peat moss or shredded pine bark
•3 ounces 20 percent superphosphate •6 ounces dolomitic limestone or ground limestone
•3 ounces complete fertilizer as 8-8-8 or 12-12-12 This “peatlite” mix is excellent for starting seeds and growing seedlings to transplant size.
The peat mixes with the other ingredients more easily if it is moist, not soaking wet.
The night before, spread the dry peat out and sprinkle with just enough water to dampen it, or dampen in the bag.
Follow these steps in mixing the ingredients:
•Pour the dampened peat moss or shredded pine bark and perlite or vermiculite in a rough pile. Sprinkle the fertilizer over the top.
•Shoveling from the base of the pile, make a second cone-shaped pile by pouring each shovelful directly on top so ingredients dribble down the sides.
•Shovel from the second pile and repeat the cone-shaped pile as before.
•Repeat the process again. It should now be well mixed.
Store the mix in clean plastic bags or plastic cans to keep it moist and clean.
Containers
Any shallow wood, metal or plastic container at least 3 inches deep makes a suitable plant growing box.
Milk cartons, foam cups, peat pots and egg cartons make nice individual plant containers.
Punch holes in the bottom of any carton, cup or pan to allow water to drain from the soil.
Sow seeds in rows 2 inches apart in a box of soil.
If seedlings touch, remove some and transplant to give them more room to grow.
If enough growing space is available, plant seeds directly into individual pots thereby eliminating the initial transplanting.
Regardless of the starting method, gardeners should allow proper space for each plant to develop.
Crowded seedlings become stretched and unhealthy.
Seedings
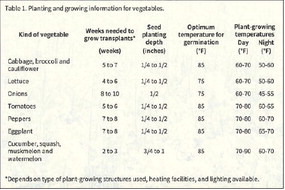
Consult Table 1 for the optimum seeding date.
Peppers require seven to eight weeks and tomatoes five or six to grow to transplanting size.
Squash and cucumbers require only two to three weeks to grow to an ideal size.
Members of the cabbage and lettuce families need four to five weeks.
Flowering annuals also vary in the time required to produce a size suitable for transplanting.
Much depends on local growing conditions.
It is important to keep a garden notebook and record seeding dates, length of time to germinate and time required to reach transplant size.
Seedlings are ready to transplant when they have the first set of true leaves.
Soil temperature is important. Cool soil retards germination. Warm the soil to about 75 degrees if possible until seedlings have emerged above the soil surface.
Provide an air temperature of 70 degrees to 75 degrees during the day and night temperature of at least 60 degrees to 65 degrees.
Cover the seed only enough to make it disappear from view [rule of thumb: two times their diameter].
The seed packet usually gives correct planting depth.
After seeding, water the soil gently but thoroughly until water drains out the bottom of the container, being careful not to wash seeds away.
Place containers in plastic bags or cover the soil surface with plastic film until the first sign of seeding emergence.
Then remove the plastic cover immediately and be sure the container gets maximum exposure to light.
Most seeds do not require light to germinate, but seedlings need full exposure to light as soon as they emerge.
Transplanting
Begin transplanting when the first true leaves are forming, usually two to three weeks after sowing.
Set the seedling at the same level it was in the seedling flat.
When firming the soil, avoid injuring tender stems.
Immediately after transplanting, water each seedling container thoroughly.
Wilting at this point can damage young plants severely.
To prevent excessive wilting, shade plants from strong sunlight for two or three days after transplanting.
Spacing
Frequently, plant quality suffers from crowding too many plants into a small area.
Crowded seedlings become weak and spindly and are more susceptible to disease.
Wider spacing or larger containers permit stronger growth.
As a rule of thumb, to produce high quality plants, space them so that the leaves of one plant do not touch those of another.
Watering
Add water to soilless media only when moisture can no longer be squeezed out by pinching the medium between the thumb and forefi nger.
Water soil only when it no longer feels moist when rubbed between the fingers.
Apply enough water at each irrigation so that some drips out of the drain holes in the bottom of the container.
Be sure the water is passing through the rootzone, not just down the inside wall of the container.
Fertilizing
After seedling emergence and during early development, strong, rapid plant growth can be assured by watering the soil with a carefully prepared solution of a soluble fertilizer that is specifically designed for plant production.
Prepare the solution exactly as prescribed on the label.
Apply the solution as an irrigation when water is needed.
Apply the solution as an irrigation when water is needed.
Apply enough to allow some to flow out the drain.
For more information, visit https://aggie-horticulture.tamu. edu/earthkind/landscape/startingseedlings- at-home.
- Texas A&M AgriLife Extension Service